Setting up LiVduino
If you are building LiVduino, please follow instructions from DIY section of our website, then return to this section.
If you bought LiVduino from our online store, your device is fully assembled, has been tested and it is ready to use: you just need to insert one CR2032 battery in the RTC module.
Instructions:
1) Install ESP8266 Board support package in your Arduino IDE: github.com/esp8266/Arduino
2) Download the github zip file: github.com/FirstCypress/livduino
Unzip. The directory "livduino-master/livduino_v01/software" contains all Arduino sketches and libraries needed to compile and upload sketches for LiVduino. For a quick start, modify your sketchbook path in your Arduino IDE so it points to this directory.
3) Download and install CH340 drivers (needed to upload sketches to Arduino Nano clone from LiVduino): www.wch.cn/download/CH341SER_ZIP.html
4) Download and install SiLabs drivers for NodeMCU: www.silabs.com/products/development-tools/software/usb-to-uart-bridge-vcp-drivers
5) Remove MCU_VIN jumper close to OLED screen every time you upload sketches on Nano or NodeMCU.
6) Connect USB micro B cable to Nano. Open "livduino_Nano" sketch and edit code with your desired alarm levels for temp, humidity and light in "livduino_Nano" sketch.
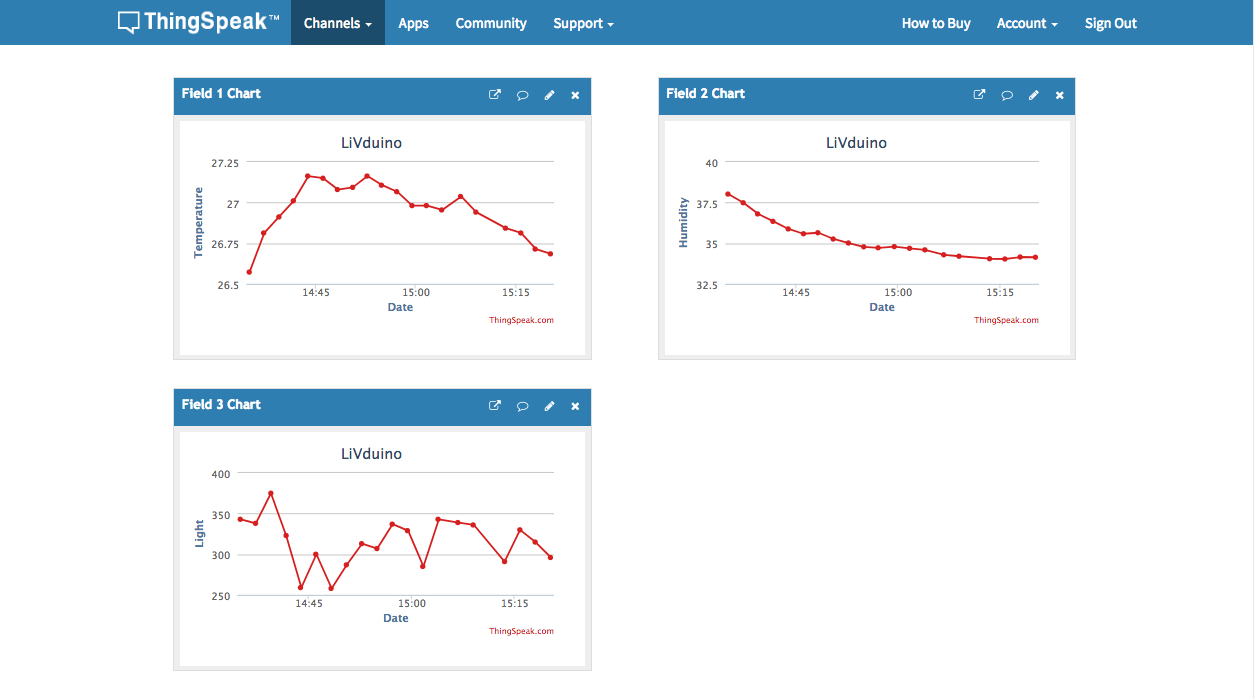
7) Connect USB mini B able to NodeMCU. Open "livduino_nodeMCU" sketch and add your specific configuration data (access point name and password, Thingspeak channel_ID and write API key - please refer to next section for more info). You can also add your Sonoff IP address if you already setup Sonoff. Compile and upload "livduino_nodeMCU" sketch to NodeMCU. When Thingspeak button is on (push down), LiVduino will write measurements data to Thingspeak.
8) Put back MCU_VIN jumper when you are done uploading your sketches
LIVduino is powered by the USB cable connected to Arduino Nano.
If you want to use LiVduino for simple automation tasks (e.g. turn on lights when is getting dark), please continue to "Setting up Sonoff" section. Otherwise, you can stop here.
If you bought LiVduino from our online store, your device is fully assembled, has been tested and it is ready to use: you just need to insert one CR2032 battery in the RTC module.
Instructions:
1) Install ESP8266 Board support package in your Arduino IDE: github.com/esp8266/Arduino
2) Download the github zip file: github.com/FirstCypress/livduino
Unzip. The directory "livduino-master/livduino_v01/software" contains all Arduino sketches and libraries needed to compile and upload sketches for LiVduino. For a quick start, modify your sketchbook path in your Arduino IDE so it points to this directory.
3) Download and install CH340 drivers (needed to upload sketches to Arduino Nano clone from LiVduino): www.wch.cn/download/CH341SER_ZIP.html
4) Download and install SiLabs drivers for NodeMCU: www.silabs.com/products/development-tools/software/usb-to-uart-bridge-vcp-drivers
5) Remove MCU_VIN jumper close to OLED screen every time you upload sketches on Nano or NodeMCU.
6) Connect USB micro B cable to Nano. Open "livduino_Nano" sketch and edit code with your desired alarm levels for temp, humidity and light in "livduino_Nano" sketch.
7) Connect USB mini B able to NodeMCU. Open "livduino_nodeMCU" sketch and add your specific configuration data (access point name and password, Thingspeak channel_ID and write API key - please refer to next section for more info). You can also add your Sonoff IP address if you already setup Sonoff. Compile and upload "livduino_nodeMCU" sketch to NodeMCU. When Thingspeak button is on (push down), LiVduino will write measurements data to Thingspeak.
8) Put back MCU_VIN jumper when you are done uploading your sketches
LIVduino is powered by the USB cable connected to Arduino Nano.
If you want to use LiVduino for simple automation tasks (e.g. turn on lights when is getting dark), please continue to "Setting up Sonoff" section. Otherwise, you can stop here.
Setting up Thingspeak
Instructions:
1) Create a Thingspeak account
2) Create a new channel with three fields: Field 1 for temperature, Field 2 for Humidity, Field 3 for Light
3) Fill in your channel ID and your writeAPIKey in "livduino_nodeMCU"
1) Create a Thingspeak account
2) Create a new channel with three fields: Field 1 for temperature, Field 2 for Humidity, Field 3 for Light
3) Fill in your channel ID and your writeAPIKey in "livduino_nodeMCU"
Setting up Sonoff
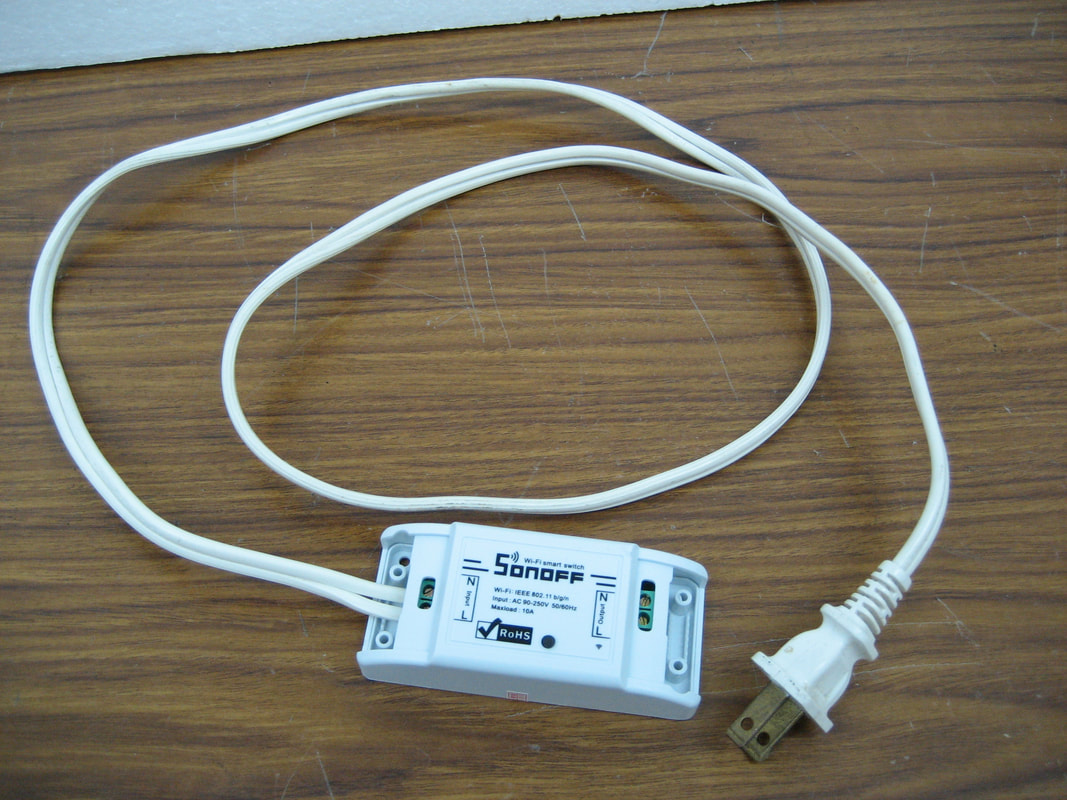
LiVduino can control the Sonoff switch. Sonoff is an affordable WiFi wireless smart switch (ESP8266 inside) manufactured by Itead: www.itead.cc/
Out of the box, Sonoff is controlled from cell phone using a proprietary/close source mobile app that connects to Itead cloud server.
Sonoff is very popular in the DIY home automation community (e.g. Domoticz) because there are open source firmware packages (e.g. ESPEasy) that can be installed on it. Once the new open source firmware is installed on Sonoff, the device can be configured to connect directly to a local WiFi access point where it can be controlled using protocols like HTTP or MQTT. ESPEasy link: www.letscontrolit.com/
If you want to use LiVduino to control Sonoff (e.g. Sonoff turns on AC unit when temperature exceeds threshold), you need to install and configure ESPEasy on your Sonoff device.
You can buy Sonoff from online stores (e.g. Amazon: www.amazon.com/Sonoff-Wireless-Switch-Module-Socket/dp/B06X6NBDFW/ref=sr_1_3?ie=UTF8&qid=1504522244&sr=8-3&keywords=Sonoff)
If you buy LiVduino from our online store, you can order a USB-TTL converter (3V3) with one 5 pin header connecter and jumper wire that you will use to flash ESPEasy to Sonoff.
SAFETY NOTE:
I could not find any reference that Sonoff is FCC or CE certified. Here is a certificate of compliance from the manufacturer: be advised that the scope of this evaluation relates to "submitted documents" and no physical device has been tested! www.itead.cc/wiki/images/f/f7/CE_Certificate_for_Sonoff_Series.pdf
Even if Sonoff were FCC or CE certified, by installing ESPEasy firmware on it, you would be voiding product warranty and certification.
When setting up Sonoff, you will be working with voltages in the 110V - 220V range. If you don't have any previous experience working with high voltages, we advise you NOT to use Sonoff.
- NEVER FLASH SONOFF WITH THE DEVICE PLUGGED INTO 110 OR 220V POWER PLUG!
- WHEN SETTING UP SONOFF, WE RECOMMEND YOU SHOULD MEASURE THE CURRENT THROUGH THE CONTROLLED APPLIANCE. SONOFF IS RATED AT MAX 10A, HOWEVER WE RECOMMEND THAT THE CURRENT SHOULD NOT EXCEED 2-3A.
We are not responsible for anything wrong (including electric shocks, malfunctions, fires and accidents) that might happen to you when you setup Sonoff. Everything you do while setting up Sonoff is at your own risks.
Instructions:
1) Open Sonoff and solder 5pin male header connector.
2) If you are using the USB-TTL adapter from us, you need to download and install this driver: www.prolific.com.tw/US/ShowProduct.aspx?p_id=225&pcid=41 Make sure the USB-TTL adapter is detected by your OS.
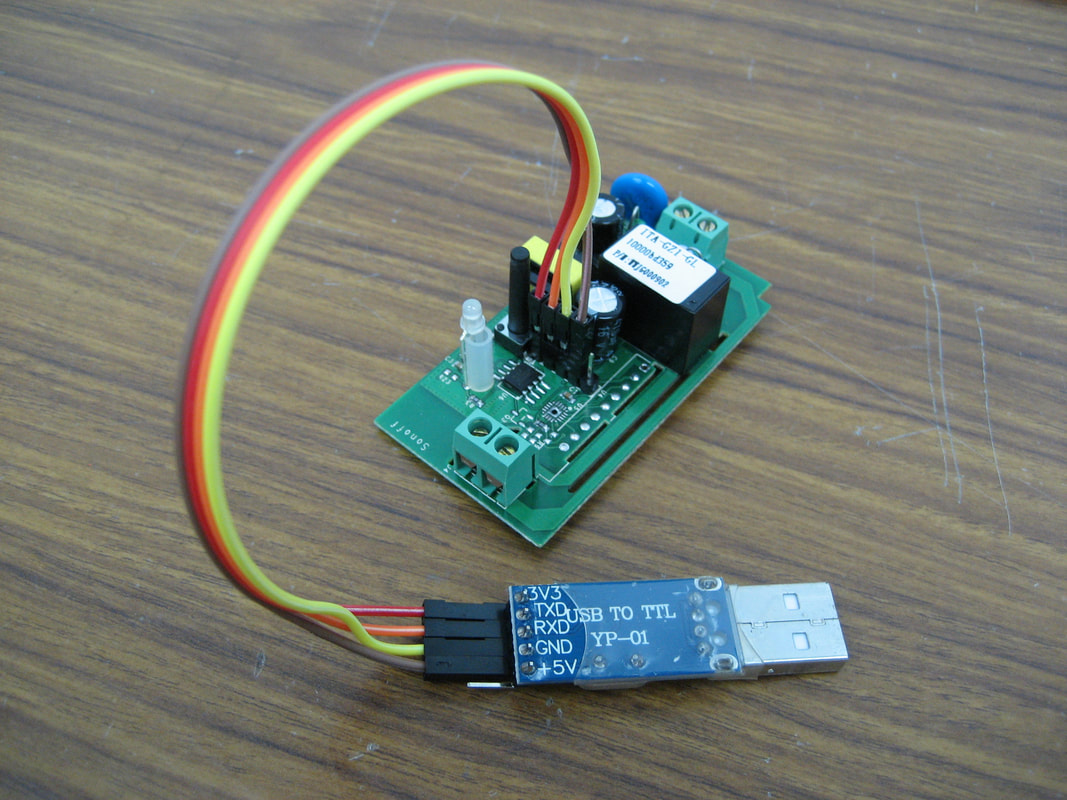
3) Connect USB-TTL adapter to Sonoff switch (see next photo). Your jumper cable colours might be different, so pay attention when you connect them. Make sure you use the 3V3 pin on USB-TTL adapter, not 5V.
1) Open Sonoff and solder 5pin male header connector.
2) If you are using the USB-TTL adapter from us, you need to download and install this driver: www.prolific.com.tw/US/ShowProduct.aspx?p_id=225&pcid=41 Make sure the USB-TTL adapter is detected by your OS.
3) Connect USB-TTL adapter to Sonoff switch (see next photo). Your jumper cable colours might be different, so pay attention when you connect them. Make sure you use the 3V3 pin on USB-TTL adapter, not 5V.
4) Download ESPEasy firmware from our shared drive or use the latest stable official ESPEasy firmware. drive.google.com/open?id=0B_023bdNWVw6R0wxWU9CdlNPN0E
5) Linux and Mac users: You will use "esptool.py" Python script for flashing Sonoff with ESPEasy firmware. Follow the installation instructions from: github.com/espressif/esptool . Press the button on top of Sonoff and insert USB-TTL adapter into the USB port of your machine. Release the button. Now Sonoff is in firmware upgrade mode. From the unzipped firmware directory use command "esptool.py --baud 115200 --port YOUR_SERIAL_PORT_HERE write_flash -fm dio -fs 1MB 0x00000000 ESPEasy_R120_1024.bin" to flash Sonoff.
Windows users: Put Sonoff into firmware update mode (push top button, insert USB-TTL adapter, release button). From the unzipped firmware directory run "Flash.cmd" in DOS console. At prompt, enter the value of your serial com, 1024 (size of flash) and 120 (build number).
6) After firmware upgrade, remove and insert back USB-TTL adapter into USB port of your machine. Now Sonoff boots with the new ESPEasy firmware.
7) Sonoff starts a WiFi access point called "ESP_0". Connect to this access point (password "configesp")
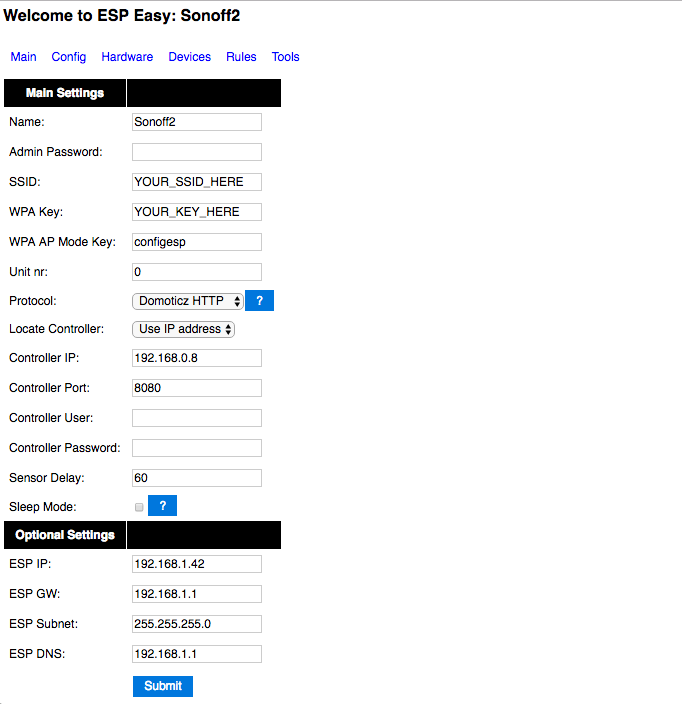
8) Configure Sonoff so it will connect to your access point. Configure Sonoff with a fixed IP address (e.g. 192.168.1.42). Add your gateway, subnet and DNS server settings. You will use this IP address in the "livduino_nodeMCU" sktech. Don't foget to click "Submit" when you are done.
5) Linux and Mac users: You will use "esptool.py" Python script for flashing Sonoff with ESPEasy firmware. Follow the installation instructions from: github.com/espressif/esptool . Press the button on top of Sonoff and insert USB-TTL adapter into the USB port of your machine. Release the button. Now Sonoff is in firmware upgrade mode. From the unzipped firmware directory use command "esptool.py --baud 115200 --port YOUR_SERIAL_PORT_HERE write_flash -fm dio -fs 1MB 0x00000000 ESPEasy_R120_1024.bin" to flash Sonoff.
Windows users: Put Sonoff into firmware update mode (push top button, insert USB-TTL adapter, release button). From the unzipped firmware directory run "Flash.cmd" in DOS console. At prompt, enter the value of your serial com, 1024 (size of flash) and 120 (build number).
6) After firmware upgrade, remove and insert back USB-TTL adapter into USB port of your machine. Now Sonoff boots with the new ESPEasy firmware.
7) Sonoff starts a WiFi access point called "ESP_0". Connect to this access point (password "configesp")
8) Configure Sonoff so it will connect to your access point. Configure Sonoff with a fixed IP address (e.g. 192.168.1.42). Add your gateway, subnet and DNS server settings. You will use this IP address in the "livduino_nodeMCU" sktech. Don't foget to click "Submit" when you are done.
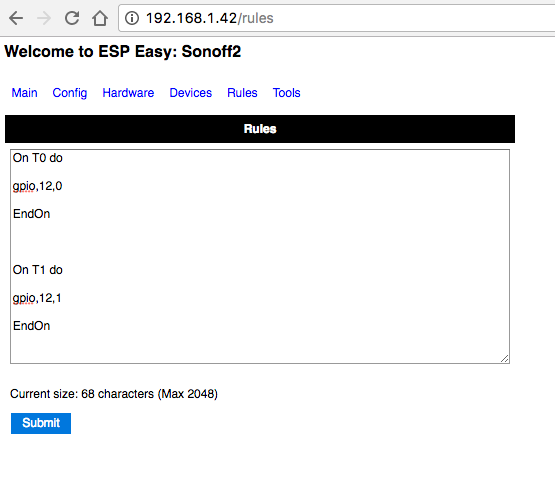
9) Reboot Sonoff. Connect to your access point and point your web browser to the fixed IP address you set up for Sonoff. Create "Rules" menu by going to Tools->Advance. Check Rules checkbox and submit. Click on newly created Rules section. Add the following set of rules to allow control of Sonoff over HTTP:
On T0 do
gpio,12,0
EndOn
On T1 do
gpio,12,1
EndOn
Click Submit button.
On T0 do
gpio,12,0
EndOn
On T1 do
gpio,12,1
EndOn
Click Submit button.
10) Take out jumper wires and install Sonoff back into its case. Connect power cable (110V or 220V) to Sonoff input. Insert power cable into power plug. Use your web browser to connect to the IP address of your Sonoff switch. You can now check if Sonoff was properly set up: Copy http://192.168.1.42/control?cmd=event,T1 in the browser address line and press Enter. You should hear the Sonoff relay clicking (the switch is now on) and see an OK confirmation in the browser.
Copy http://192.168.1.42/control?cmd=event,T0 in the browser address line and press Enter. You should hear the Sonoff relay clicking (the switch is now off) and see an OK confirmation in the browser.
Use your Sonoff IP address if you are using another IP address instead of 192.168.1.42
You should here the Sonoff relay clicking when it switches on and off.
You can now connect your controlled appliance to Sonoff output.
According to specs, Sonoff Basic is rated for a maximum current of 10A and power of 2200W. www.itead.cc/sonoff-wifi-wireless-switch.html
SAFETY NOTE: WE SUGGEST YOU SHOULD NOT RELY ON ADVERTISED POWER OF BOTH SONOFF AND THE APPLIANCE CONNECTED AT THE OUTPUT CONNECTOR OF SONOFF. WE ADVISE YOU TO MEASURE THE CURRENT ON SONOFF OUTPUT. WE SUGGEST A MAXIMUM CURRENT THAT DOES NOT EXCEED 2-3A.
